By Andrew Cant (DoP). Meet Andrew on Facebook, Twitter, Instagram
As independent cinematographers, it’s important for us to recognize the impact of lighting a scene correctly has on the overall image that we capture. Camera movement and shot composition are all important but if you have a flat, uninteresting scene then no matter how great your camera work is, your output will be lacking something.
Today we’re going to take a look at the basics of cinematic lighting. There are loads of tutorials on the internet that go through some of the basics but I’m going to try to condense the important aspects into a couple of brief articles – a cinematographer’s digest, if you will. So, here we go with what I call the 1-2-3 of cinematic lighting, and then we’re going to talk about breaking these rules.
1. Key light
The first light you should strike in your scene is the key light. This is the light that illuminates your subject and delivers the overall exposure to the scene. I like to set this at around an F2.0 to allow me to have a nice open (but not wide open) lens on my camera to allow for a nice depth of field. That assumes that we’re going for a balanced lighting look.
The general rule is you never shoot hard light directly at your subject for a key light. It’s just too harsh and gives ugly shadows. We’ll talk about shooting the key light with a bounce or diffusers in a later article.
2. Back light
Your second light should be your backlight. This adds separation of your subject from their background and can also be combined with color to add interest to the scene. Direct hard light can be fine for this light. You may find that in many of your scenes, your back light may well be sunlight, either directly in an outdoor scene, or through a window in an indoor scene.
On a high budget controlled set, these are likely to be your big budget lights (18ks, M10s, etc.) providing a strong back light from a long way away to avoid being in shot.
3. Fill light
This is the third light you should add to your scene and this is used to control contrast on your subject. Depending on the style and mood of the scene I will use a different contrast level to depict mood. If I’m shooting a comedy, I may only have a ½ stop of contrast between key and fill, if that. If I’m shooting a drama though, I may go for 2 or even 3 full stops of contrast.
To achieve this level of contrast sometimes it’s required to use “negative fill” – that is using a flag (or “solid”) to cut any spill or ambient light hitting the subject from the environment.
After this, the lighting you may add to your scene will be for lighting the layers of your scene. I generally look at lighting the background of a drama scene about 2 stops lower than my main subject, just to draw the eye to the subject and not the nice painting on the wall.
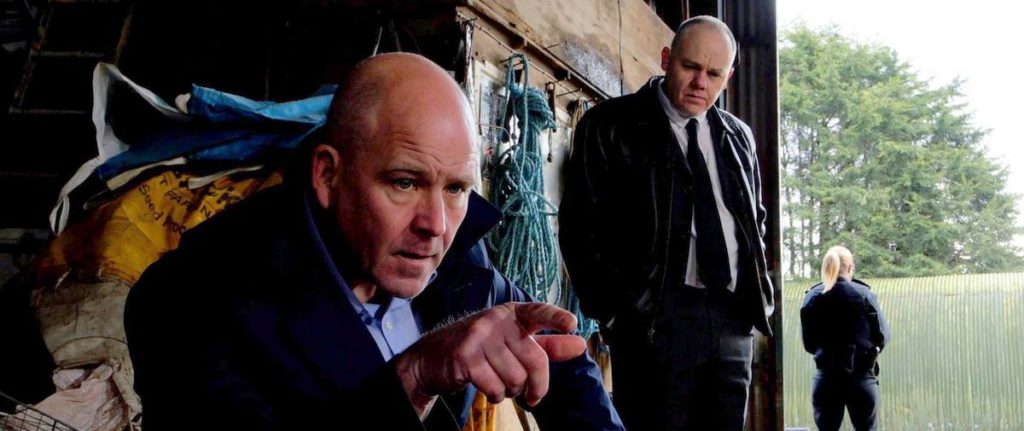
Now we’ve spoken about the rules, we’re going to break a couple to see how it works. The image below shows a frame grab from some footage I shot in an agricultural warehouse for the feature film “Soldiers of Embers”.
This scene involves two detectives inspecting a crime scene. What I wanted to get across in this scene was the feeling that this is a cold, dirty and unpleasant place, so one of the first things you might notice is that my background is lit quite high compared to my subjects. I have added some detail lights to ensure that once we have been drawn to see the detective in the foreground, and his colleague, we then start to see the awful place that they’re in.
The ropes on rusty hooks, and the bags and textiles in the corner, all add to the effect. To then add a backlight to that side of the actors (camera left of the actors) would then add too much brightness and would reduce the impact, so I used the lighter background and darker subject to separate the actors on that side. The typical backlight is on the camera right of the actors. The motivation for the backlight is the open barn door but this was not strong enough to light the way I wanted, so I added an LED Fresnel in the doorway to boost the intensity.
I broke the key light rule by shooting my subjects with direct hard light for this scene. Actually, I went with 3 direct hard lights in a row. My plan was to keep the ugly hard shadows but to give an eye light that replicates the sky lights that you see along the roof and upper wall panels on this style of barn. If you zoom into the main character’s eye you’ll see the reflection of the 3 lights emulating the barn skylights.
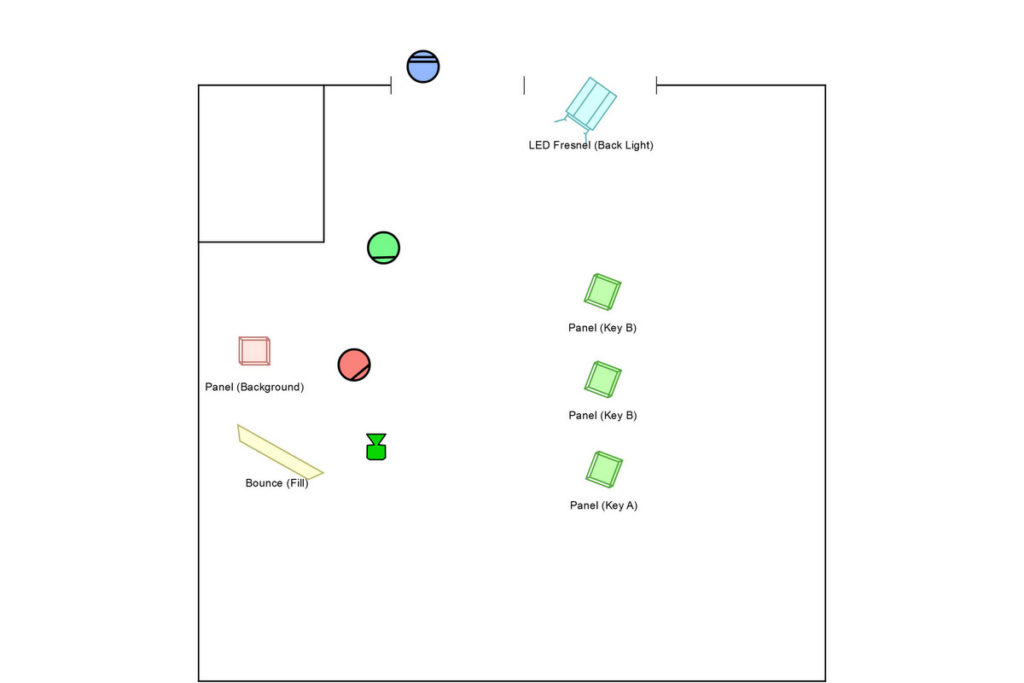
To round off this shot I added some bounce fill on camera left to give a tiny bit of detail on camera left of the subject. I didn’t want to reduce the contrast as this was quite an unpleasant scene in a dark and dingy setting, so I used a little bit of bounce to just pick up little details like the actor’s ear, and a bit of texture on his face. The lighting diagram for this scene is below.
We made some good use of low power LED lighting in this scene to make the most of our limited power options and to keep the noise levels down as any noise was bouncing incredibly badly in this metal construction warehouse. As a low budget shoot, a couple of low cost lights brought this scene to life with a very sinister look that helps to add mood and emotion to the scene. Without those lights in place the scene would have only a fraction of the impact.
In the next part we’ll dive a little deeper into lighting techniques and will start to look at diffusion, color and other techniques to shape light in your scene.
Thanks for spending some time with us! But, like most things in life, it’s not what you have that counts… it’s what you do with it that really matters. P.S. Big thanks to indieactivity.com for the opportunity to share our experience with you!
MORE STORIES FOR YOU


